Does anyone know the differences between the earlier and later HMMWV serpentine belts?
I'm guessing there must be a difference in lengths.
Two different belts are:
3030-01-488-5606 0AKY3 20-9646 BELT,SERPENTINE SERIAL NUMBER
196901 AND ABOVE.
3030-01-466-9476 0AKY3 20-8021 BELT,V ALL WEATHER SERIAL NUMBER 196900 AND BELOW.
The belt I got off Paul Moeller as an A2 belt is a Dayco belt with details: OAKY3 20-6612 BELT,V RCSK17561 and appears to be a little too short.
Cheers
Serpentine Belts
Moderator: Kurt Lesser
-
dunsbr

- G-Lieutenant General

- Posts: 4098
- Joined: Thu Dec 09, 2004 2:53 pm
- Location: Melbourne, Australia
- Contact:
Serpentine Belts
Brad Dunstan
RHD '87 M1026
(with 4L80E Trans, 242 T/case, 12K hubs, CTIS, A2 wiring, Air Con, A2 ebrake, 9k Winch,
Serpentine Belt Accessory Drive & Eaton e-lockers)
RHD '87 M1026
(with 4L80E Trans, 242 T/case, 12K hubs, CTIS, A2 wiring, Air Con, A2 ebrake, 9k Winch,
Serpentine Belt Accessory Drive & Eaton e-lockers)
-
Ted Gates

- G-Major General

- Posts: 2667
- Joined: Sun Dec 15, 2002 12:13 pm
- Location: Eaton Rapids, MI
-
dunsbr
- G-Lieutenant General
- Posts: 4098
- Joined: Thu Dec 09, 2004 2:53 pm
- Location: Melbourne, Australia
- Contact:
Well I spent an interesting morning with the Managing Director of Dayco Australia today... 
He was very interested in the Humvee and happy to help with belt selection.
After some too and fro-ing we found that a 100" belt is the ideal.
(Though a 99" may be OK too)
Civvy part numbers are 8PK2540 for the 100" and 8PK2515 for the 99"
The original A2 belt was around 97" long.
With the 100" belt, the tensioner is sitting like this:

As you can see the tensioner is sitting right in the middle of its adjustment range.
This pic shows the intall before I made up a mount bracket for the second back idler on the top (my phone went flat so I couldn't take a pic of that install )
)
Here's a pic from the other angle:
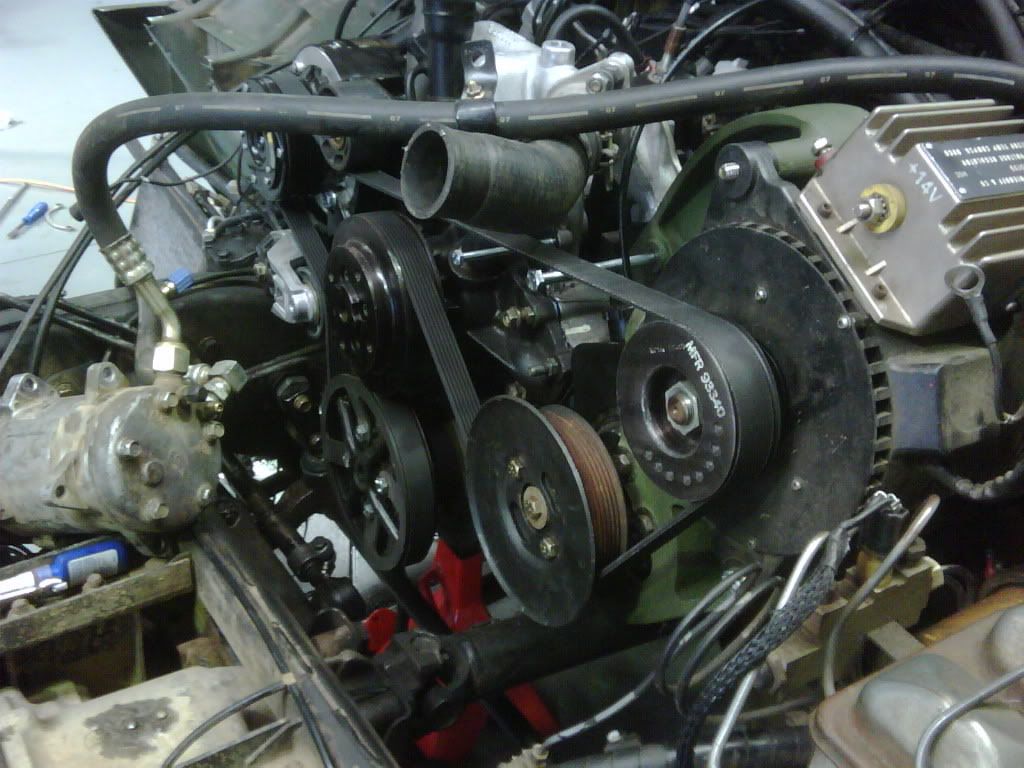
You can see that the second idler is essential to clear the radiator hose!
Cheers
He was very interested in the Humvee and happy to help with belt selection.
After some too and fro-ing we found that a 100" belt is the ideal.
(Though a 99" may be OK too)
Civvy part numbers are 8PK2540 for the 100" and 8PK2515 for the 99"
The original A2 belt was around 97" long.
With the 100" belt, the tensioner is sitting like this:
As you can see the tensioner is sitting right in the middle of its adjustment range.
This pic shows the intall before I made up a mount bracket for the second back idler on the top (my phone went flat so I couldn't take a pic of that install
Here's a pic from the other angle:
You can see that the second idler is essential to clear the radiator hose!
Cheers
Brad Dunstan
RHD '87 M1026
(with 4L80E Trans, 242 T/case, 12K hubs, CTIS, A2 wiring, Air Con, A2 ebrake, 9k Winch,
Serpentine Belt Accessory Drive & Eaton e-lockers)
RHD '87 M1026
(with 4L80E Trans, 242 T/case, 12K hubs, CTIS, A2 wiring, Air Con, A2 ebrake, 9k Winch,
Serpentine Belt Accessory Drive & Eaton e-lockers)
-
STUDENT-DRIVER

- G-Brigadier General

- Posts: 2356
- Joined: Sat Jul 22, 2006 8:18 am
- Location: Germany
- Contact:
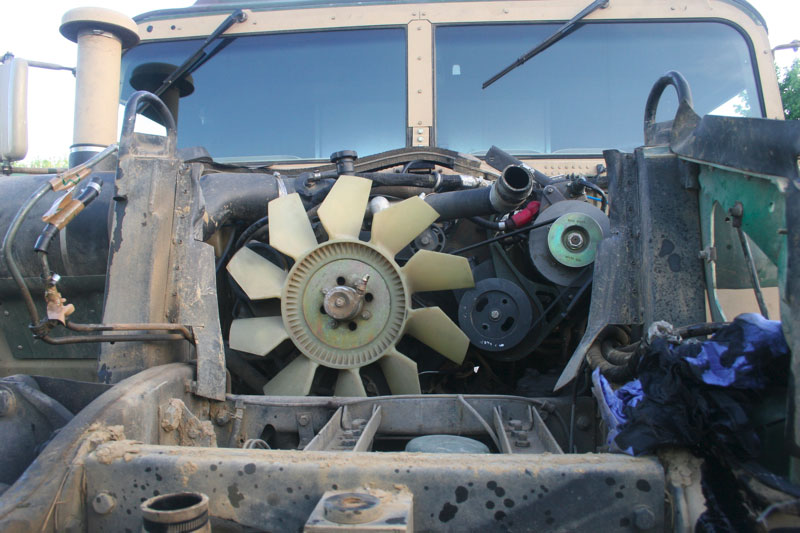
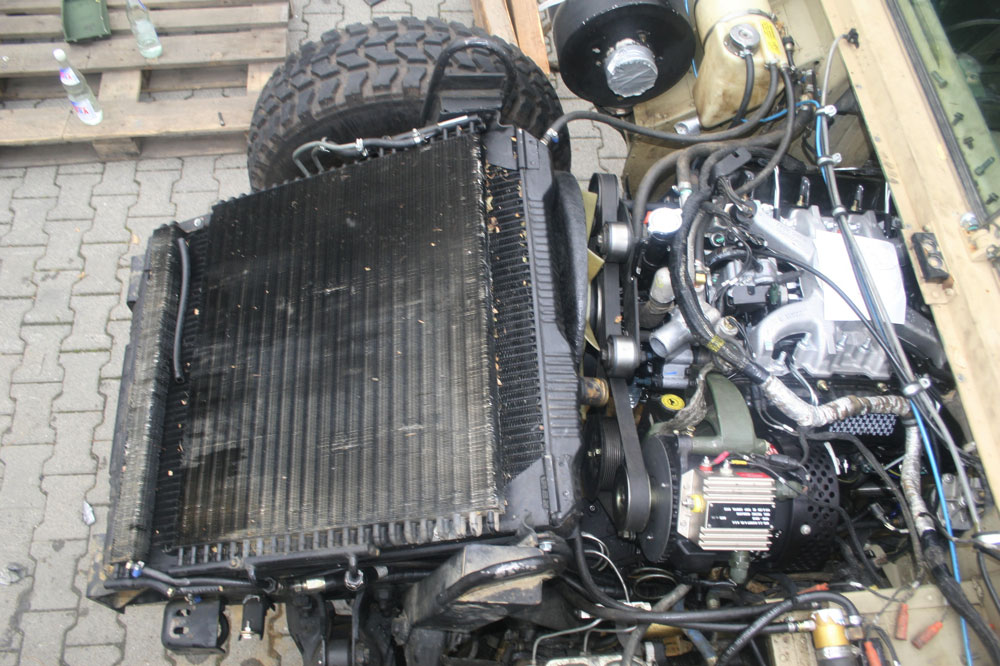
Here Brad is mine setup okay with out the ac compressor maybe it helps

I break it, I fix it!
http://youtube.com/user/STUDENTDRIVER123" onclick="window.open(this.href);return false;
Playmate of the month April 2011 (HUMMER CAL.)
http://youtube.com/user/STUDENTDRIVER123" onclick="window.open(this.href);return false;
Playmate of the month April 2011 (HUMMER CAL.)
-
STUDENT-DRIVER
- G-Brigadier General
- Posts: 2356
- Joined: Sat Jul 22, 2006 8:18 am
- Location: Germany
- Contact:
prad could you please mesure the diameter from the engine pully?
Looks larger than mine.
Thanks
Alex
Looks larger than mine.
Thanks
Alex
I break it, I fix it!
http://youtube.com/user/STUDENTDRIVER123" onclick="window.open(this.href);return false;
Playmate of the month April 2011 (HUMMER CAL.)
http://youtube.com/user/STUDENTDRIVER123" onclick="window.open(this.href);return false;
Playmate of the month April 2011 (HUMMER CAL.)
-
dilvoy

- G-Lieutenant General
- Posts: 6185
- Joined: Tue May 18, 2004 4:28 pm
- Location: San Francisco, Ca.
serpentine belts
Hey Alex, It looks like you have a mix of brackets there. The right hand bracket is an early type and the left hand bracket that is holding the Alt is the late type that positions the Alt farther away from the engine to allow for a pulley between the Alt and Power Steering Pump to allow for more belt wrap. Have you had any problems with slippage of the Power Steering Pulley during driving on or offroad? I'm shure that Brad would be interested in your answer as well as I.
George D. Paxinos
M998
M1123A2
M998
M1123A2
-
STUDENT-DRIVER
- G-Brigadier General
- Posts: 2356
- Joined: Sat Jul 22, 2006 8:18 am
- Location: Germany
- Contact:
No No 
I just killed the 200 AMP alternator in the stream and I could not get a new one so I had to fit the 100 AMP in that bracket and that's why the tensenor was not applied now everything is back to normal :_D
I have two 100 AMP in spare but until now no brackets but I just ordered two few days ago. So the the next time I kill the 200 I can mount the 100 as it used to be.
I break it, I fix it!
http://youtube.com/user/STUDENTDRIVER123" onclick="window.open(this.href);return false;
Playmate of the month April 2011 (HUMMER CAL.)
http://youtube.com/user/STUDENTDRIVER123" onclick="window.open(this.href);return false;
Playmate of the month April 2011 (HUMMER CAL.)
-
dilvoy
- G-Lieutenant General
- Posts: 6185
- Joined: Tue May 18, 2004 4:28 pm
- Location: San Francisco, Ca.
serpentine belts
Thanks for letting me know that Alex. I have been worried about belt jumpimg problems.
George D. Paxinos
M998
M1123A2
M998
M1123A2
-
dunsbr
- G-Lieutenant General
- Posts: 4098
- Joined: Thu Dec 09, 2004 2:53 pm
- Location: Melbourne, Australia
- Contact:
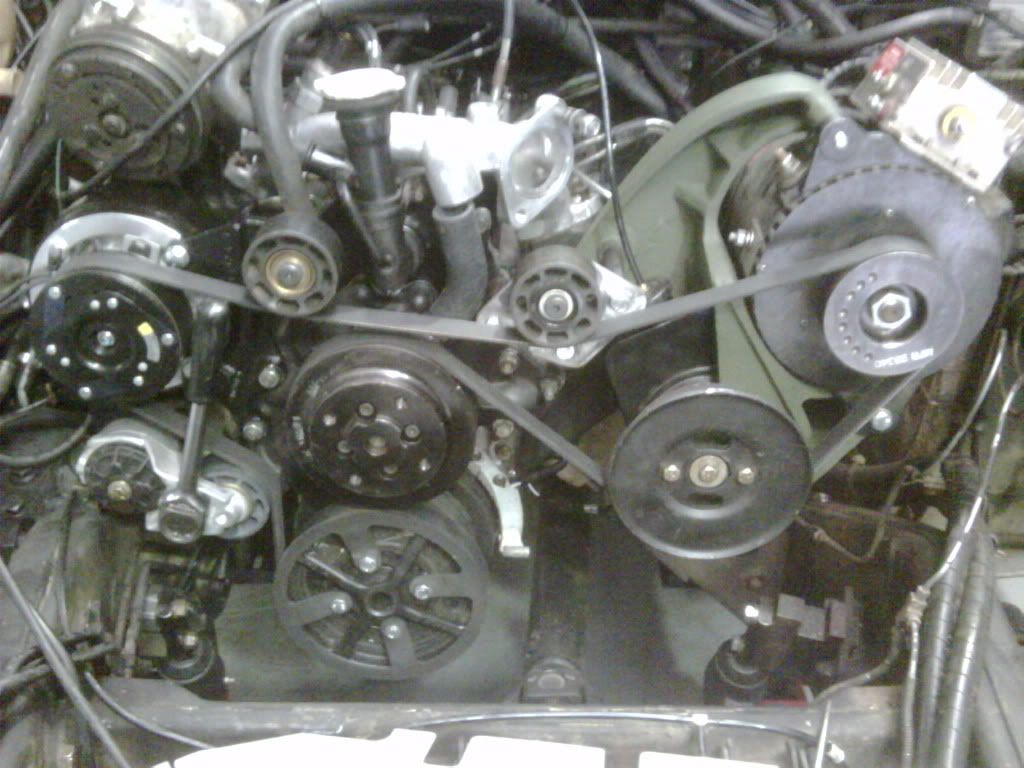
I think I've finished the Serpentine install now...
Here's a few pics:
This first one shows the complete set up including the new bracket for the second back idler.
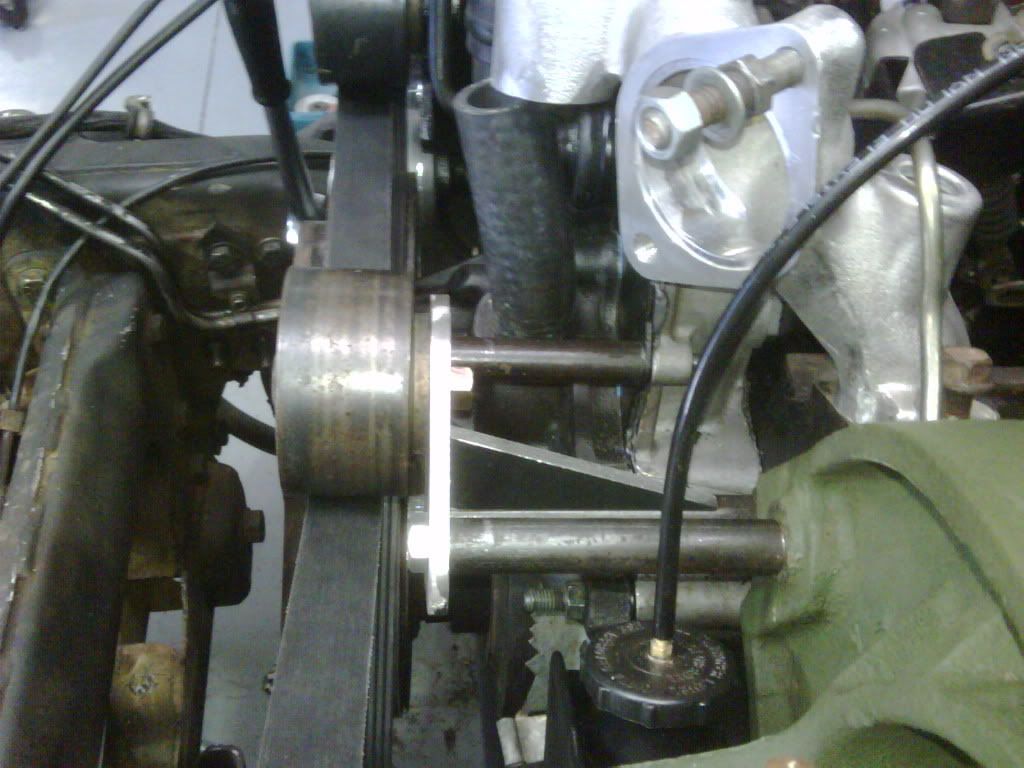
Her's a view of the rear of the new bracket showing the spacer tubes and the gusset from the idler back down to the botom spacer tube.
(One of the advantages of this setup is that you can now actually see the power steering reservoir cap!! )
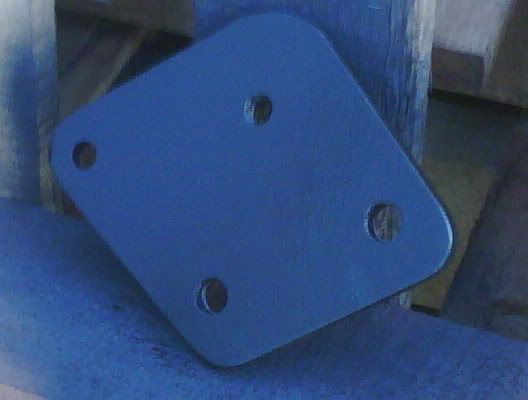
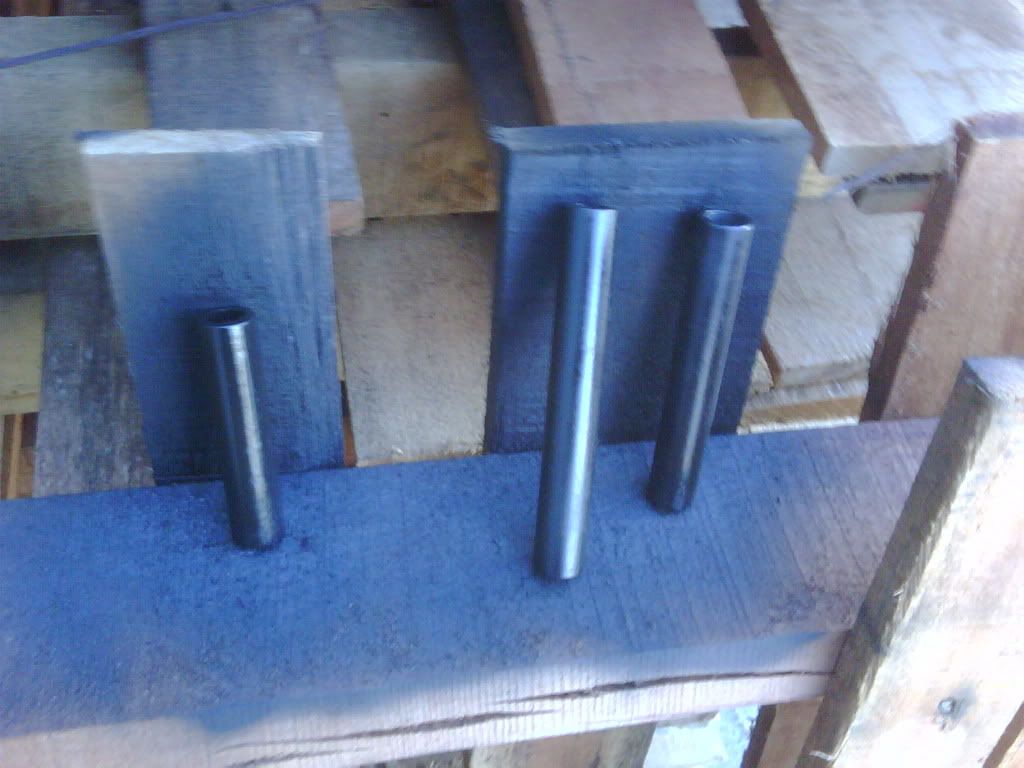
Here's pics of the components that make up the new second idler bracket.
Here's the set up with the fan installed.
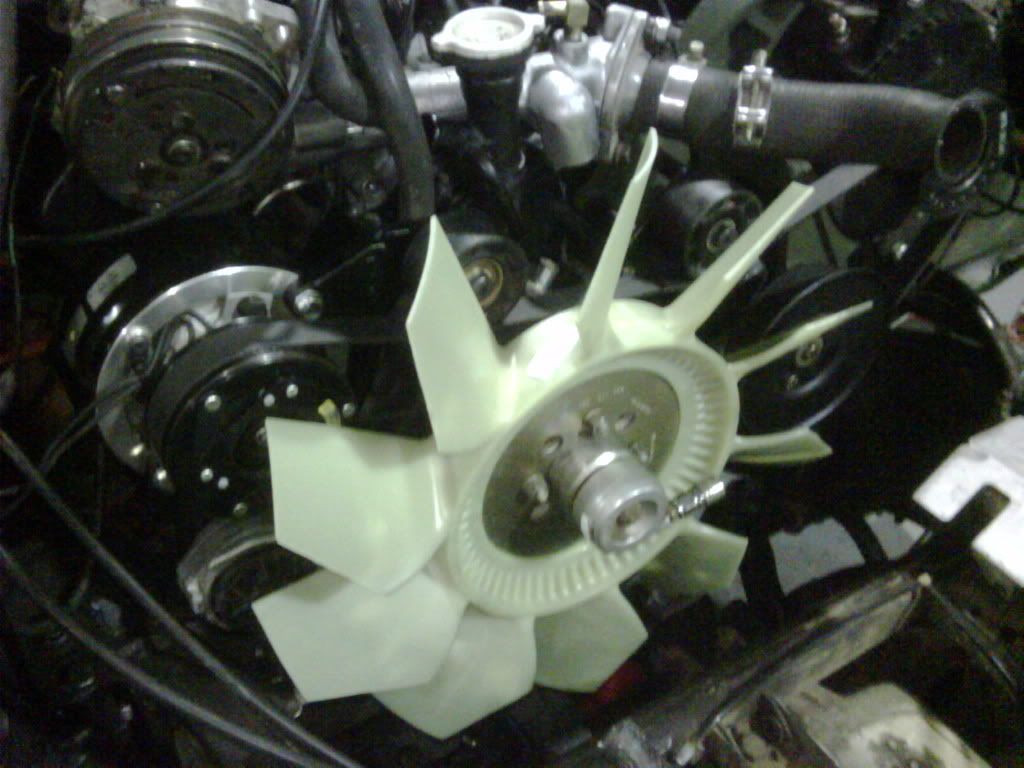
Dilvoy, is your fan this close to the A/C compressor clutch?
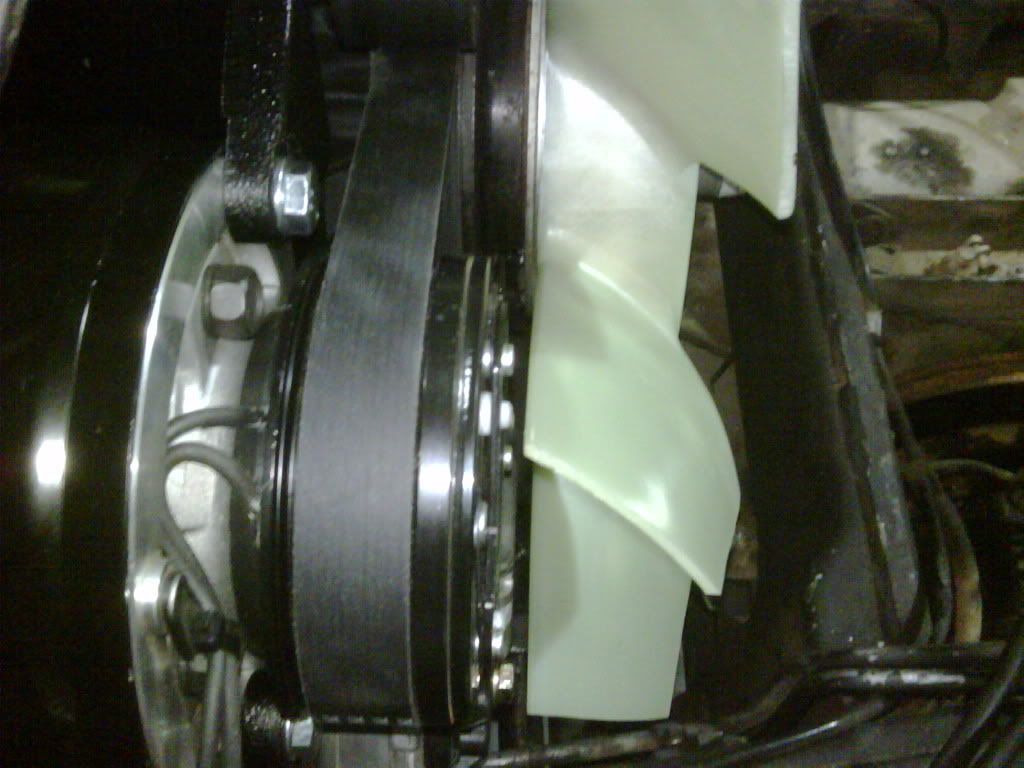
I realise that the A/C clutch and the fan are rigidly fixed to the engine, but it is pretty darn close!
Cheers
Here's a few pics:
This first one shows the complete set up including the new bracket for the second back idler.
Her's a view of the rear of the new bracket showing the spacer tubes and the gusset from the idler back down to the botom spacer tube.
(One of the advantages of this setup is that you can now actually see the power steering reservoir cap!!
Here's pics of the components that make up the new second idler bracket.
Here's the set up with the fan installed.
Dilvoy, is your fan this close to the A/C compressor clutch?
I realise that the A/C clutch and the fan are rigidly fixed to the engine, but it is pretty darn close!
Cheers
Brad Dunstan
RHD '87 M1026
(with 4L80E Trans, 242 T/case, 12K hubs, CTIS, A2 wiring, Air Con, A2 ebrake, 9k Winch,
Serpentine Belt Accessory Drive & Eaton e-lockers)
RHD '87 M1026
(with 4L80E Trans, 242 T/case, 12K hubs, CTIS, A2 wiring, Air Con, A2 ebrake, 9k Winch,
Serpentine Belt Accessory Drive & Eaton e-lockers)
-
dunsbr
- G-Lieutenant General
- Posts: 4098
- Joined: Thu Dec 09, 2004 2:53 pm
- Location: Melbourne, Australia
- Contact:
Hi Alex,STUDENT-DRIVER wrote:prad could you please mesure the diameter from the engine pully?
Looks larger than mine.
Thanks
Alex
my crankshaft pulley is 199mm across the diameter with the belt installed.
Cheers
Brad Dunstan
RHD '87 M1026
(with 4L80E Trans, 242 T/case, 12K hubs, CTIS, A2 wiring, Air Con, A2 ebrake, 9k Winch,
Serpentine Belt Accessory Drive & Eaton e-lockers)
RHD '87 M1026
(with 4L80E Trans, 242 T/case, 12K hubs, CTIS, A2 wiring, Air Con, A2 ebrake, 9k Winch,
Serpentine Belt Accessory Drive & Eaton e-lockers)
-
dunsbr
- G-Lieutenant General
- Posts: 4098
- Joined: Thu Dec 09, 2004 2:53 pm
- Location: Melbourne, Australia
- Contact:
Alex,
I notice you have tape on your upper radiator hose.
Is that to protect it from being hit by the serpentine belt?
I didn't think they slapped that much.
Cheers
I notice you have tape on your upper radiator hose.
Is that to protect it from being hit by the serpentine belt?
I didn't think they slapped that much.
Cheers
Brad Dunstan
RHD '87 M1026
(with 4L80E Trans, 242 T/case, 12K hubs, CTIS, A2 wiring, Air Con, A2 ebrake, 9k Winch,
Serpentine Belt Accessory Drive & Eaton e-lockers)
RHD '87 M1026
(with 4L80E Trans, 242 T/case, 12K hubs, CTIS, A2 wiring, Air Con, A2 ebrake, 9k Winch,
Serpentine Belt Accessory Drive & Eaton e-lockers)
-
STUDENT-DRIVER
- G-Brigadier General
- Posts: 2356
- Joined: Sat Jul 22, 2006 8:18 am
- Location: Germany
- Contact:
No taht was also depending on the 100 AMP alternator. At the begin I mounted the alternater on the upper bracket arm and that was to close and hit the hose...
I'll messure the diameter tonight...
I'll messure the diameter tonight...
I break it, I fix it!
http://youtube.com/user/STUDENTDRIVER123" onclick="window.open(this.href);return false;
Playmate of the month April 2011 (HUMMER CAL.)
http://youtube.com/user/STUDENTDRIVER123" onclick="window.open(this.href);return false;
Playmate of the month April 2011 (HUMMER CAL.)
-
STUDENT-DRIVER
- G-Brigadier General
- Posts: 2356
- Joined: Sat Jul 22, 2006 8:18 am
- Location: Germany
- Contact:
Okay mine has the same size
I break it, I fix it!
http://youtube.com/user/STUDENTDRIVER123" onclick="window.open(this.href);return false;
Playmate of the month April 2011 (HUMMER CAL.)
http://youtube.com/user/STUDENTDRIVER123" onclick="window.open(this.href);return false;
Playmate of the month April 2011 (HUMMER CAL.)
-
dilvoy
- G-Lieutenant General
- Posts: 6185
- Joined: Tue May 18, 2004 4:28 pm
- Location: San Francisco, Ca.
serpentine belts
Hey Brad, I can't access my email from my home computer, because it had a problem with the hard drive and I haven't sorted everything out yet, so I'm contacting you here through the G.
I found that stud that will allow you to keep the upper part of the heavy Alternator, Power Steering Pump and associated Bracket still attached to the Head, if there were any need to swap out the pulley bracket that you are building. The stud if used with a normal washer, will have a full seven threads into the head and has the hex nut in the center for tightening. Then there are ten threads of stud sticking out for your bracket leg to attach too. This is only on the furthest mounting hole on the Alt Bracket towards the center of the engine. The casting of the bracket gets too thick at the location of the other hole, but I think that this will do the trick. I can send you a couple of these studs for no charge, but you pay for the shipping. I think I can arrange very quick shipping via Perth for approx $10,000. What do you say?
I found that stud that will allow you to keep the upper part of the heavy Alternator, Power Steering Pump and associated Bracket still attached to the Head, if there were any need to swap out the pulley bracket that you are building. The stud if used with a normal washer, will have a full seven threads into the head and has the hex nut in the center for tightening. Then there are ten threads of stud sticking out for your bracket leg to attach too. This is only on the furthest mounting hole on the Alt Bracket towards the center of the engine. The casting of the bracket gets too thick at the location of the other hole, but I think that this will do the trick. I can send you a couple of these studs for no charge, but you pay for the shipping. I think I can arrange very quick shipping via Perth for approx $10,000. What do you say?
George D. Paxinos
M998
M1123A2
M998
M1123A2
Who is online
Users browsing this forum: No registered users and 40 guests