MB / GPW 1942 Jeep Project

Create a thread to track the progress of you MB/GPW restoration progress. Previously a General Discussion board.
Warbird Kid
G-Sergeant
G-Sergeant
Posts: 34
Joined: Wed Jul 10, 2013 7:01 pm
Location:

MB / GPW 1942 Jeep Project

Post by Warbird Kid » Wed Jul 10, 2013 9:27 pm

Hey Guys,

First time poster and Im glad to be here to share our project! With buying an MB Jeep, my father and I have alot to learn from here.

Well.... we finally did it..... (we meaning my dad and I). We pulled the trigger and bought a 1942 MB Jeep! We plan on getting this Jeep running for the end of Summer and utilizing it with the local air museum, the Connecticut Air & Space Center. So here it goes!

Image

Image

Image

Image

Image

This 42 MB (as far as we can tell) was rebuilt in Germany by Daimler-Benz either in 1945 or immediately after WWII. We found this plate on the side of the engine block.

Image

Image

She also came with these plates in German...

Image

We found this interesting, the speedometer is apparently the exact same that can be found in VW Beetles. Hence the "Made in Germany"

Image

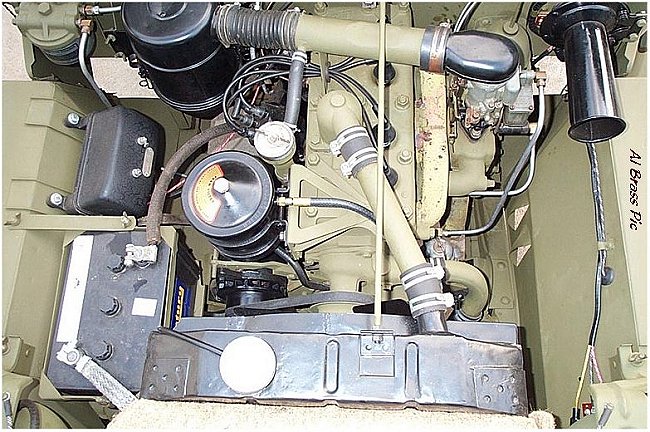
So we finally got the Jeep home on Saturday and have since started tinkering with her. We know that this Jeep was essentially restored by a local auto body shop in 2007. She was never registered in the state, but was registered previously in New York. The actual body is a reproduction tub but the frame, engine, and smaller accessories are all original from what we can tell. The Jeep (being hardly driven since 2007) has a TON of fresh parts on her and is 99% rust free.

Image

She didn't have any stopping power in the brakes, so we figured to check the master cylinder.

Image

Off comes the plate......

Image

What we find appears to be an incorrectly positioned Master Cylinder cap. We're hoping this is the cause of the zero braking capability. We'll be picking up new brake line fluid along with a new plastic plug cap to replace the old one. If this isn't the solution, then we expect we'll have to replace the entire master cylinder.

Image

So with this project stalled, we moved onto another dilemma! One of the rear cargo hatches wasn't closing or opening right.

Image

Image

The latch didn't keep the door closed so we took it off, fiddled with it, shot it with some lubricant, and reinstalled it. Good as new!

Image

Image

Image

We also reinstalled the radiator rod and repainted it.

Image

Image

Image

Image

All in all, not a bad first work night. Alot more to come! So stay tuned!

Image
Last edited by Warbird Kid on Mon Jun 02, 2014 11:22 am, edited 1 time in total.
Keep Em' Flying,
Christopher Soltis

Dedicated to the preservation and education of The Sikorsky Memorial Airport

CASC Blog Page: http://ctair-space.blogspot.com/
Warbird Wear: http://warbirdwear.com/

Chicks Dig Warbirds.......right?


User avatar
macaddict23
G-Major General
G-Major General
Posts: 2832
Joined: Mon Mar 15, 2010 9:49 pm
Location:

Re: MB 1942 Jeep Project

Post by macaddict23 » Wed Jul 10, 2013 9:34 pm

Nice looking Jeep!

Is there a number stamped along the top-edge of the driver-side entrance?

Dexter
"Originality . . . It just needs to be what it is."

User avatar
macaddict23
G-Major General
G-Major General
Posts: 2832
Joined: Mon Mar 15, 2010 9:49 pm
Location:

Re: MB 1942 Jeep Project

Post by macaddict23 » Wed Jul 10, 2013 9:38 pm

Like this here:
Attachments
Screen Shot 2013-07-10 at 10.37.53 PM.png
Screen Shot 2013-07-10 at 10.37.53 PM.png (253.55 KiB) Viewed 19674 times
"Originality . . . It just needs to be what it is."

dct
Sergeant Major of the Gee
Posts: 266
Joined: Thu Nov 25, 2010 6:43 am
Location:

Re: MB 1942 Jeep Project

Post by dct » Thu Jul 11, 2013 12:13 am

Nice!

Incidentally, the data plates are in French, not German.

User avatar
ElwoodJayBlues
Bluesman of the Gee
Posts: 4992
Joined: Wed Nov 12, 2003 6:18 am
Location: Aschaffenburg- Germany
Contact:

Re: MB 1942 Jeep Project

Post by ElwoodJayBlues » Thu Jul 11, 2013 1:15 am

dct wrote:Nice!

Incidentally, the data plates are in French, not German.
At least not the kind of german I speak...
MB 134202, stamped grill, script back
"Lili Marlene"

"Vor der Kaserne, vor dem großen Tor..."

User avatar
The Raven
G-Lieutenant Colonel
Posts: 1167
Joined: Wed Aug 31, 2011 4:00 am
Location: Nunya

Re: MB 1942 Jeep Project

Post by The Raven » Thu Jul 11, 2013 3:17 am

I mentioned over on the 2a boards that this jeep has a lot of peculiarities......like no holes anywhere for any accessories, reflectors, or data plates. Some Phillips heads screws and a plastic plug for the master cyl. A Benz rebuild, and the non combat rims.

It's like it was a kit jeep build 75% from Repop parts.
The Law of Unintended Consequences has come into play. All the best..-A

Warbird Kid
G-Sergeant
G-Sergeant
Posts: 34
Joined: Wed Jul 10, 2013 7:01 pm
Location:

Re: MB 1942 Jeep Project

Post by Warbird Kid » Thu Jul 11, 2013 12:14 pm

Thanks for the warn welcome guys!

Dexter:
As far as I can tell, no. The tub is a repro.

dct:
Yes upon closer examination, those plates are indeed in french! (should have known). I hope to get the numbers to you guys and maybe you'll be able to help piece the history of this Jeep back together!

The Raven:
Nice to know I'm not the only one bouncing back and forth from the two forums! The tub is definitely a repro, with some not so authentic parts. This is the best situation for my father and I. It gives us the ability to tinker around on her and have fun with her. We won't be afraid to drill holes into the new body to install various hardware. Eventually I'll compile a list of the repro parts and original we have.
Keep Em' Flying,
Christopher Soltis

Dedicated to the preservation and education of The Sikorsky Memorial Airport

CASC Blog Page: http://ctair-space.blogspot.com/
Warbird Wear: http://warbirdwear.com/

Chicks Dig Warbirds.......right?

User avatar
The Raven
G-Lieutenant Colonel
Posts: 1167
Joined: Wed Aug 31, 2011 4:00 am
Location: Nunya

Re: MB 1942 Jeep Project

Post by The Raven » Thu Jul 11, 2013 12:50 pm

Yup, on both forums, different strokes for different folks....being new here I'll let you develop your own posting guidelines as to what goes where. Nice jeep for the designated purpose too.
Warbird Kid wrote:Thanks for the warn welcome guys!

Dexter:
As far as I can tell, no. The tub is a repro.

dct:
Yes upon closer examination, those plates are indeed in french! (should have known). I hope to get the numbers to you guys and maybe you'll be able to help piece the history of this Jeep back together!

The Raven:
Nice to know I'm not the only one bouncing back and forth from the two forums! The tub is definitely a repro, with some not so authentic parts. This is the best situation for my father and I. It gives us the ability to tinker around on her and have fun with her. We won't be afraid to drill holes into the new body to install various hardware. Eventually I'll compile a list of the repro parts and original we have.
The Law of Unintended Consequences has come into play. All the best..-A

User avatar
lucakiki
G-General
G-General
Posts: 17578
Joined: Sat Feb 15, 2003 7:18 am
Location: Torino, ITALY

Re: MB 1942 Jeep Project

Post by lucakiki » Thu Jul 18, 2013 1:38 pm

Warbird Kid, you state that your tub is a repro. It might well be a repro on which they did not bother to drill all the necessary holes, but I wonder if it might by any chance be a reworked French tub.
Would it be possible to see a picture of the toeboard gusset?

The rectangular depression around the toolbox lock (which by the way looks french to me, since it does not appear as having a keyed button) suggests they wanted to reproduce a GPW tub.
The lids themselves have the Ford ribs.

The spare wheel looks like an original solid rim,at least from the picture, while the other look like French Hotchkiss rims.
Luca

WillysMB#344142 6-19-44 Navy N.S.Blue Grey
45 Bantam T-3 #57248 1-10-45
42 Willys MB-T #13560 11-42
43 Willys MB-T # 25417 4-43
Way too many WWII military tools,hopefully thinning down,and way too many posts...

__________________________________________
_____________________________________________
__________________________________________

Warbird Kid
G-Sergeant
G-Sergeant
Posts: 34
Joined: Wed Jul 10, 2013 7:01 pm
Location:

Re: MB 1942 Jeep Project

Post by Warbird Kid » Fri Jul 19, 2013 8:23 am

A simple and small update. My dad wants to continue working on the Jeep as much as possible, regardless of how small of a job it may seem. He figures if we keep doing whatever we can, the bigger stuff will fall into place. So today we noticed that the passenger's seat cushioned weren't completely fastened down.

Image

Neither was the back rest.
Image

So I busted out the trusty ice pick from the kitchen and lined up the holes...
Image

Image

Then it was a matter of screwing in the new screws...
Image

Two original bolts we're still attached to the bottom of the seat pan for the bottom cushion. These we're NOT MOVING so we ground out the nuts and made quick work of them.
Image

Image

Image

Next was to mark where the holes had to be punched into the cushion and installed. (Sorry for the blurred images)
Image

Image

No picture of the finished result but you get the idea.
Keep Em' Flying,
Christopher Soltis

Dedicated to the preservation and education of The Sikorsky Memorial Airport

CASC Blog Page: http://ctair-space.blogspot.com/
Warbird Wear: http://warbirdwear.com/

Chicks Dig Warbirds.......right?

User avatar
lucakiki
G-General
G-General
Posts: 17578
Joined: Sat Feb 15, 2003 7:18 am
Location: Torino, ITALY

Re: MB 1942 Jeep Project

Post by lucakiki » Fri Jul 19, 2013 12:22 pm

Warbird, since you two want to tackle little jobs in order to improve the overall appearance of your jeep, here is a suggestion.
The person who restored the jeep apparently thought that spraying everything in Olive Drab gives a military look to the vehicle, but unfortunately it is not so.
I had a look at your engine compartment, and really I see an ample space for improvement.
To begin with, remove the air filter and spray it in black semigloss, because that is how they were.
Clean out with care, patience and solvent the distributor cap.They should be brown in color, but even a non original black is better than a painted appearance.
Same for the regulator cover : it should not be o.d. but black, with a peculiar finish.

If you go to jeepdraw.com there is a section where the color and finish of every jeep part is listed:very useful.
There are also nice pictures of top class restorations, that should inspire you for a quick beautyfarming of your engine bay.
Luca

WillysMB#344142 6-19-44 Navy N.S.Blue Grey
45 Bantam T-3 #57248 1-10-45
42 Willys MB-T #13560 11-42
43 Willys MB-T # 25417 4-43
Way too many WWII military tools,hopefully thinning down,and way too many posts...

__________________________________________
_____________________________________________
__________________________________________

Warbird Kid
G-Sergeant
G-Sergeant
Posts: 34
Joined: Wed Jul 10, 2013 7:01 pm
Location:

Re: MB 1942 Jeep Project

Post by Warbird Kid » Fri Jul 19, 2013 12:36 pm

Thanks Luca! That is something I'll look into!
Keep Em' Flying,
Christopher Soltis

Dedicated to the preservation and education of The Sikorsky Memorial Airport

CASC Blog Page: http://ctair-space.blogspot.com/
Warbird Wear: http://warbirdwear.com/

Chicks Dig Warbirds.......right?

User avatar
lucakiki
G-General
G-General
Posts: 17578
Joined: Sat Feb 15, 2003 7:18 am
Location: Torino, ITALY

Re: MB 1942 Jeep Project

Post by lucakiki » Fri Jul 19, 2013 12:39 pm

Luca

WillysMB#344142 6-19-44 Navy N.S.Blue Grey
45 Bantam T-3 #57248 1-10-45
42 Willys MB-T #13560 11-42
43 Willys MB-T # 25417 4-43
Way too many WWII military tools,hopefully thinning down,and way too many posts...

__________________________________________
_____________________________________________
__________________________________________

Warbird Kid
G-Sergeant
G-Sergeant
Posts: 34
Joined: Wed Jul 10, 2013 7:01 pm
Location:

Re: MB 1942 Jeep Project

Post by Warbird Kid » Mon Jul 22, 2013 11:06 am

It was a fun day yesterday. Especially since we finally put the Jeep on the road and got her actually down the road! Drew King, the director to our air museum was a big help and a valuable set of extra hands. We even ran down to the shop and grabbed a few extra needed tools.

We got that pesky Master Cylinder Cap off and found that it wasn't bone dry.
Image

Heres yours truly inspecting the MC.
Image

We poured more brake fluid in and began bleeding the brakes. Kind of messy to say the least. I know how we'll be performing this task next time.

Image

We put her outside to test the brakes before taking her out.

Image

Image

First ride with her!
http://www.flickr.com/photos/cherrybomb13/9340244254/

Found a few problems with her, namely the emergency brake line was RUBBING AGAINST THE DRIVE SHAFT. :shock: Not pleasant so we'll be rerouting that. We'll also be bleeding the brakes some more to try and see if we can get better traction. Other than that, the horn is still on our short list. Always more work to do!

Image
Keep Em' Flying,
Christopher Soltis

Dedicated to the preservation and education of The Sikorsky Memorial Airport

CASC Blog Page: http://ctair-space.blogspot.com/
Warbird Wear: http://warbirdwear.com/

Chicks Dig Warbirds.......right?

User avatar
The Raven
G-Lieutenant Colonel
Posts: 1167
Joined: Wed Aug 31, 2011 4:00 am
Location: Nunya

Re: MB 1942 Jeep Project

Post by The Raven » Mon Jul 22, 2013 12:25 pm

Luca is Right.....the olive drab engine look is a bit over the top. Should nt be hard to pick up a can of semi gloss black and paint it up. Also on your brakes; speedbleeders are your friends :D about $7 ea and make bleeding effortless
The Law of Unintended Consequences has come into play. All the best..-A


Post Reply

Return to “MB GPW Restoration Projects”

Who is online

Users browsing this forum: No registered users and 16 guests