Warbird kid, here are a couple of easy jobs that would greatly enhance the appearance of your MB/GPW.
Replace those garden clamps on your radiator hoses with a set of correct looking ones, and patiently repaint in OD the bezels of the dashboard instruments: the present black finish sticks out as a sore thumb.
MB / GPW 1942 Jeep Project
-
lucakiki

- G-General

- Posts: 17578
- Joined: Sat Feb 15, 2003 7:18 am
- Location: Torino, ITALY
Re: MB 1942 Jeep Project
Luca
WillysMB#344142 6-19-44 Navy N.S.Blue Grey
45 Bantam T-3 #57248 1-10-45
42 Willys MB-T #13560 11-42
43 Willys MB-T # 25417 4-43
Way too many WWII military tools,hopefully thinning down,and way too many posts...
__________________________________________
_____________________________________________
__________________________________________
-
Lester Senn
- Sergeant Major of the Gee

- Posts: 375
- Joined: Mon Aug 24, 2009 2:05 pm
- Location: Northwest Iowa USA
Re: MB 1942 Jeep Project
Warbird Kid,here is another easy correction job.You mentioned painting your radiator support rod,your rod is positioned wrong on the cowling end.If you look at Luca,s over head engine compartment picture you will see that the rod should run straight back to the cowl.It is almost in line with the spark plugs.The cowling hole should be near the second hood mount bolt from the drivers side not the third bolt like yours is.A quick fix for your father to do.Have fun with your project.
Lester
-
The Raven

- G-Lieutenant Colonel

- Posts: 1167
- Joined: Wed Aug 31, 2011 4:00 am
- Location: Nunya
Re: MB 1942 Jeep Project
Regarding those clamps Luca mentioned; there is correct then there is what works. I have correct and took some time and torque before they stopped dribbling. Some folks suggest goop on the mating ends to prevent this....but the same folks also admit the later hose clamps work the best. Unless you are showing it or caring what it looks like I would leave them as is. As you know there is form....then there is function.
The Law of Unintended Consequences has come into play. All the best..-A
-
lucakiki
- G-General
- Posts: 17578
- Joined: Sat Feb 15, 2003 7:18 am
- Location: Torino, ITALY
Re: MB 1942 Jeep Project
Warbird Kid, if you are still with us and you are reading my unsolicited advice, you will wonder why I posted what I posted.
The fact is that from your posts I had the feeling that you and your father were interested in improving the details with simple jobs, in order to make your vehicle more appealing to the average jeep guy and erase the "quick make up in order to sell it" aspect inflicted to your vehicle by the person who "restored" it.
If I was wrong, just disregard my advice: let me tell you, though, that correct clamps work perfectly without damaging the hoses as the garden clamps do when overtightened, and are much more pleasant to the eye. OK?
Luca
WillysMB#344142 6-19-44 Navy N.S.Blue Grey
45 Bantam T-3 #57248 1-10-45
42 Willys MB-T #13560 11-42
43 Willys MB-T # 25417 4-43
Way too many WWII military tools,hopefully thinning down,and way too many posts...
__________________________________________
_____________________________________________
__________________________________________
WillysMB#344142 6-19-44 Navy N.S.Blue Grey
45 Bantam T-3 #57248 1-10-45
42 Willys MB-T #13560 11-42
43 Willys MB-T # 25417 4-43
Way too many WWII military tools,hopefully thinning down,and way too many posts...
__________________________________________
_____________________________________________
__________________________________________
-
The Raven
- G-Lieutenant Colonel
- Posts: 1167
- Joined: Wed Aug 31, 2011 4:00 am
- Location: Nunya
Re: MB 1942 Jeep Project
He does have a point there....the "restoration" is a bit...um unresearched.
The Law of Unintended Consequences has come into play. All the best..-A
-
Jon

- Australian Army (Retired) R.A.E.M.E.
 R.A.E.M.E.")
- Posts: 11949
- Joined: Mon May 04, 1998 8:00 pm
- Location: Down Under In Queensland
- Contact:
Re: MB 1942 Jeep Project
Nice jeep, has unlimited potential, congratulations to you and your Dad on the work so far.
Here's a photo of an original that may help explain Luca's point about the radiator stay rod.......it becomes obvious when you look at it.
Also...... Check the Parts_Colours Page for MB's under RADIATOR for the stay rod colour..
Cheers
Jon
From the ENGINE section of the Parts_Colours Page http://jeepdraw.com/PART_COLOURS.htm
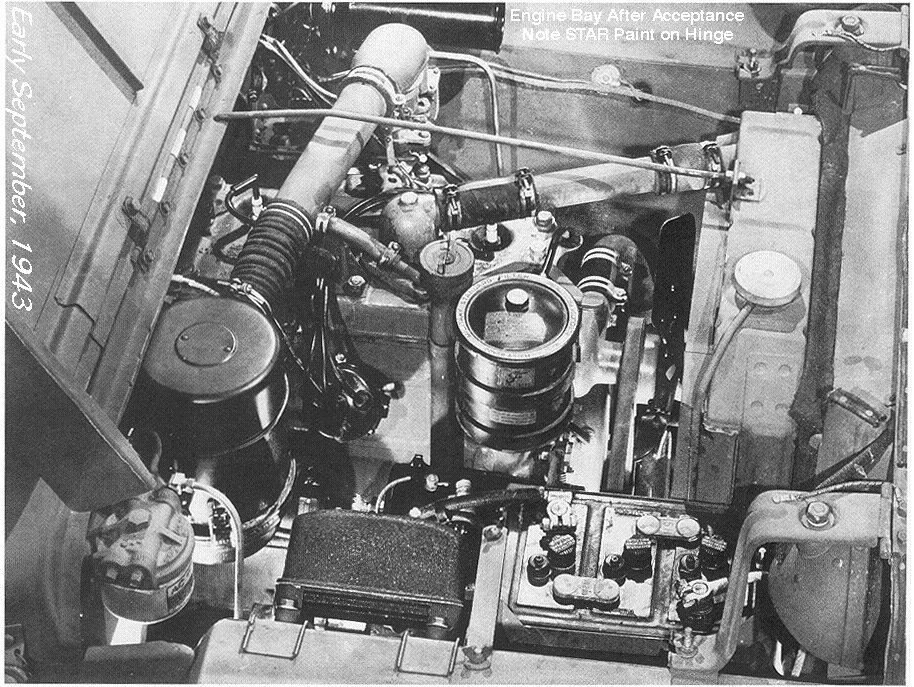
Here's a photo of an original that may help explain Luca's point about the radiator stay rod.......it becomes obvious when you look at it.
Also...... Check the Parts_Colours Page for MB's under RADIATOR for the stay rod colour..
Hope it helps.Radiator Stay Rod (From the firewall to the tag on the radiator top is Olive Drab) Not Marked.
Cheers
Jon
From the ENGINE section of the Parts_Colours Page http://jeepdraw.com/PART_COLOURS.htm
Jon Rogers
AUSTRALIA
http://jeepdraw.com JeepDraw Home Page & Drawings
Parts Colours Page http://jeepdraw.com/PART_COLOURS.htm
1944 GPW195611 20531384 ACM-2 17781
1942 MBT 19433W
AUSTRALIA
http://jeepdraw.com JeepDraw Home Page & Drawings
Parts Colours Page http://jeepdraw.com/PART_COLOURS.htm
1944 GPW195611 20531384 ACM-2 17781
1942 MBT 19433W
-
lawcdw
- G-First Lieutenant

- Posts: 666
- Joined: Sat Oct 27, 2012 2:12 pm
- Location: Cheyenne Wyoming
Re: MB 1942 Jeep Project
A very nice project keep up he great work!!!!!!!!!!!!..CW
-
Warbird Kid
- G-Sergeant

- Posts: 34
- Joined: Wed Jul 10, 2013 7:01 pm
- Location:
Re: MB 1942 Jeep Project
Thanks for all the advice and input. Luca I'm definitely going to be taking alot of your considerations into practice. Some like the clamps might take awhile. As we get into this project more and more (and as my father and I learn more about the Willys GPW models) the more we realize who restored this Jeep did not know the type well.
All aside, we are hoping to create a good balance of form and function. Stuff like the garden clamps don't bother us immediately, but will probably be replaced with more original ones eventually. Our main goal is to just get the thing running well, get temp plates on her, then get her completely registered. The rest is gravy.
Anyways onto some small updates! We tested the horn, and sounded just fine! But she looks a little rough, so off she came. (Only attached with one bolt )
)


I'll be taking this to the shop to have it sandblasted (along with the air filter) and then both painted semigloss black.
On the day we brought this Jeep home, we had already ruined her. This black smudge of grease showed up. Anyone have any ideas on how to remove grease from canvas?

Another big task to undertake was the inventory of all the parts that came with the Jeep.

Box O' Mystery

A couple of neat items that we're included in the buy, was an WWII US Infantry foxhole shovel and pick axe.

Looks like she was used

And of course the pile of miscellaneous parts. Anyone want to identify?

We also have a set of brackets for the canvas top. We have the frame and what you see here. Anyone know what we're missing?

We also added an extra light in the garage (over the engine compartment) just to see a little easier.

Some other things we did today was to reroute the parking brake cable. This is looking much better, considering how badly the cable was rubbing on the drive shaft before.
We also reversed the linkage bolt connecting the clutch. Again it was improperly installed.


All in all not a bad day. Things to still do is bleed the brakes some more to see if we can get the pedal up. If we don't see any success, then we'll have to consider replacing the master cylinder.

All aside, we are hoping to create a good balance of form and function. Stuff like the garden clamps don't bother us immediately, but will probably be replaced with more original ones eventually. Our main goal is to just get the thing running well, get temp plates on her, then get her completely registered. The rest is gravy.
Anyways onto some small updates! We tested the horn, and sounded just fine! But she looks a little rough, so off she came. (Only attached with one bolt
I'll be taking this to the shop to have it sandblasted (along with the air filter) and then both painted semigloss black.
On the day we brought this Jeep home, we had already ruined her. This black smudge of grease showed up. Anyone have any ideas on how to remove grease from canvas?
Another big task to undertake was the inventory of all the parts that came with the Jeep.
Box O' Mystery
A couple of neat items that we're included in the buy, was an WWII US Infantry foxhole shovel and pick axe.
Looks like she was used
And of course the pile of miscellaneous parts. Anyone want to identify?
We also have a set of brackets for the canvas top. We have the frame and what you see here. Anyone know what we're missing?
We also added an extra light in the garage (over the engine compartment) just to see a little easier.
Some other things we did today was to reroute the parking brake cable. This is looking much better, considering how badly the cable was rubbing on the drive shaft before.
We also reversed the linkage bolt connecting the clutch. Again it was improperly installed.
All in all not a bad day. Things to still do is bleed the brakes some more to see if we can get the pedal up. If we don't see any success, then we'll have to consider replacing the master cylinder.
Keep Em' Flying,
Christopher Soltis
Dedicated to the preservation and education of The Sikorsky Memorial Airport
CASC Blog Page: http://ctair-space.blogspot.com/
Warbird Wear: http://warbirdwear.com/
Chicks Dig Warbirds.......right?
Christopher Soltis
Dedicated to the preservation and education of The Sikorsky Memorial Airport
CASC Blog Page: http://ctair-space.blogspot.com/
Warbird Wear: http://warbirdwear.com/
Chicks Dig Warbirds.......right?
-
The Raven
- G-Lieutenant Colonel
- Posts: 1167
- Joined: Wed Aug 31, 2011 4:00 am
- Location: Nunya
Re: MB 1942 Jeep Project
It is funny, on my jeep I smile when I get something like grease spots on my canvas. I call it character and a story.
The Law of Unintended Consequences has come into play. All the best..-A
-
sjalbert
- G-Brigadier General

- Posts: 2270
- Joined: Mon Jul 30, 2007 10:28 pm
- Location: Bellaire, TX
Re: MB 1942 Jeep Project
Don't spend any money on the horn. It's so wrong you wouldn't even find it a motor pool.
In the miscellaneous parts photo I see
Top Row: a horn bracket (OD part, attaches to the firewall), a pair of door strap brackets w/ bolts, possibly a speedometer mounting bracket, an unknown piece of metal
Next Row: a horn wire, an unknown strap, a door strap eye bolt, an Ax handle bracket, another unknown piece of metal, possibly a wire junction
I can't see any of the bagged parts clearly and I'm sure that your dad identified the oil filter wrench
He doesn't by any chance work for UTAS? He looks like somebody I've met out there.
Seth
******
1944 MB 349858, 20620361
1942 MBT 10968 viewtopic.php?f=18&t=149552
1942 MBT 15799, USA 0217497 viewtopic.php?f=18&t=225199
MVPA # 8587
Com / Inst. SMEL
CFII - ASEL
KI5LYB
Collecting Willys Engine Info. Please send me Engine #, Casting Date & Machining Date if known
******
1944 MB 349858, 20620361
1942 MBT 10968 viewtopic.php?f=18&t=149552
1942 MBT 15799, USA 0217497 viewtopic.php?f=18&t=225199
MVPA # 8587
Com / Inst. SMEL
CFII - ASEL
KI5LYB
Collecting Willys Engine Info. Please send me Engine #, Casting Date & Machining Date if known
-
Jon
- Australian Army (Retired) R.A.E.M.E.
- Posts: 11949
- Joined: Mon May 04, 1998 8:00 pm
- Location: Down Under In Queensland
- Contact:
Re: MB 1942 Jeep Project
Remove the parts from the plastic baggies and take a closer photo......
JR
JR
- Attachments
-
- Pile-O-parts.jpg (133.57 KiB) Viewed 13715 times
Jon Rogers
AUSTRALIA
http://jeepdraw.com JeepDraw Home Page & Drawings
Parts Colours Page http://jeepdraw.com/PART_COLOURS.htm
1944 GPW195611 20531384 ACM-2 17781
1942 MBT 19433W
AUSTRALIA
http://jeepdraw.com JeepDraw Home Page & Drawings
Parts Colours Page http://jeepdraw.com/PART_COLOURS.htm
1944 GPW195611 20531384 ACM-2 17781
1942 MBT 19433W
-
Mark Tombleson

- MZ Radio Operator
- Posts: 9837
- Joined: Wed Dec 11, 2002 7:58 pm
- Location: Selah, Washington
Re: MB 1942 Jeep Project
sjalbert wrote:Don't spend any money on the horn. It's so wrong you wouldn't even find it a motor pool.
Back up a bit on that horn issue, Seth... until we know what it is.
I'm cutting and pasting here guys... sorry.
That looks like a short horn to me.
It could be a 1945-47 WO-A-17378 Horn assembly, (SPW-B-10323)
viewtopic.php?f=4&t=80155&hilit=horn
a late war [July & August 1945] 2" trumpet Sparton horn WO-A-17715 (SPW-B-10539)
viewtopic.php?f=4&t=44211&hilit=horn
or maybe Civy CJ.
So, are there any markings on it? Look carefully!
1945 SNL shows:
6 volt
WO-A-1312, FM-GPW-13802 Horn assembly, (SPW-B-9427) (SZE-61400)
12 volt
FM-GPA-13802 Horn assembly
We also have TM 9-803 and Ord 9 SNL-G503 supplements under Navy contract NObsr-29091 (Deep Water Fording) that shows the short horn installed in a photo (page 10) and listed in the supplement as follows:
WO-A-17378 Horn assembly, (SPW-B-10323)
The above horns are official documented parts for the MB/GPW. The 12v and short horn are replacement horns as required in those supplements and not factory."
viewtopic.php?f=4&t=163312&p=942357&hilit=Sparton#p942357
viewtopic.php?f=4&t=178626&p=1032437&hi ... n#p1032437
I see we have ripped some of the threads out. Jon, is there any chance of getting those threads back as they are technical in nature and not some frivolous topic.
I did not see if your MB is 6v or 12v?
For the original poster... nice jeep, but remember you need to figure out exactly what parts you have as I see you appear to be doing. What seems to be bubba can be some rare part that you can trade for something you need on your jeep.
Edited to show the threads not working in RED, Jon.
Last edited by Mark Tombleson on Wed Jul 31, 2013 10:32 pm, edited 1 time in total.
MB-NAVY-MZ-1 352625 - 07/20/44 (DOD est.)
U.S.N. 133818
2nd place Restored Class 2008 Portland Convention
MVPA Hall of Fame - 2013
U.S.N. 133818
2nd place Restored Class 2008 Portland Convention
MVPA Hall of Fame - 2013
-
Jon
- Australian Army (Retired) R.A.E.M.E.
- Posts: 11949
- Joined: Mon May 04, 1998 8:00 pm
- Location: Down Under In Queensland
- Contact:
Re: MB 1942 Jeep Project
Point me to the missing bits Markie and I'll see what can be done mate
JR
JR
Jon Rogers
AUSTRALIA
http://jeepdraw.com JeepDraw Home Page & Drawings
Parts Colours Page http://jeepdraw.com/PART_COLOURS.htm
1944 GPW195611 20531384 ACM-2 17781
1942 MBT 19433W
AUSTRALIA
http://jeepdraw.com JeepDraw Home Page & Drawings
Parts Colours Page http://jeepdraw.com/PART_COLOURS.htm
1944 GPW195611 20531384 ACM-2 17781
1942 MBT 19433W
-
Chuck Lutz

- Gee Addict
- Posts: 26829
- Joined: Wed Jun 28, 2006 7:00 am
- Location: Jeep Heaven
Re: MB 1942 Jeep Project
Take a look at the clutch tube....the clutch CABLE is held onto it with a CLEVIS PIN and COTTER PIN, not a bolt and washers....those should be replaced.
I noticed that the tube itself is practically falling off the round ball pivot on the transfer case so I wonder if this is even mounted or if you are holding it in position?
Either the mounting on the frame is wrong, the clutch tube is wrong or cut, or the trans/transfer case is off-set to the right....how about a couple pics to confirm that?
PS....the horn is wrong in that the mount is wrong for a jeep even if the horn is a 6 volt that will work on it....if you can mount the Horn Bracket as identified in the UNKNOWNS pile on the firewall and get the correct bracket to mount the horn itself to that bracket and the horn is 6-volt and works, then you surely could use it.
You need to remove the BELL on the horn to beadblast it then remove the PLATE inside and clean off any rust on it....then mask off the internals so you can blast the BODY (rear) of the horn assembly. Then prime and paint the BELL and the BODY and assemble and then attach the bracket to the horn mount on the firewall and wire that sucker up!
Untill you find a SPARTON R-14 which can set you back a few or so Benjamins.....that one will work fine,
Chuck Lutz
GPW 17963 4/24/42 Chester, PA. USA 20113473 (USA est./Tom W.)
Bantam T3-C 1947
GPW 17963 4/24/42 Chester, PA. USA 20113473 (USA est./Tom W.)
Bantam T3-C 1947
-
hell-fire

- G-Major General

- Posts: 3443
- Joined: Tue Oct 02, 2007 4:06 am
- Location:
Re: MB 1942 Jeep Project
A few easy things I would do which would work wonders is adding the 1/2 door snaps & fit the hood bow hardware, measurements from Jeep draw.
Last edited by hell-fire on Sun Sep 08, 2013 1:32 am, edited 1 time in total.
John
Australia
Member VMVC #192
1942 Willys MB-BRT 135673 D.O.D. 4-16-42 Now 97% finished

Australia
Member VMVC #192
1942 Willys MB-BRT 135673 D.O.D. 4-16-42 Now 97% finished
Who is online
Users browsing this forum: No registered users and 39 guests